Over time, you have probably learned many fail-safe methods for a successful photograph. When I first started, I abided by many of the following rules: stay in focus, use the rule of thirds, refrain from cutting off your subject’s limbs, maintain even exposure, among others. It is helpful in the beginning to really get a handle on the technical aspects of an artform so that you can work more efficiently later on. Here are a few “rules” I continuously enjoy breaking with some examples. Cut that subject up! Deciding what to include in an image is more important than being afraid of what’s removed if it makes that image stronger. If this means amputating someone, so be it. Make that subject feel like they’re in a J.J. Abrams film! Oh lens flare. The technique that has grown so popular it’s actually less of a thing to avoid & more of a thing to embrace. There’s something inherently mystical about the golden glow it provides. Center that subject! Something they teach every visual artist in every medium is to avoid putting the focal point in the middle. I say bump that. Centering a person reinforces symmetry as […]
Read More
I’ve chosen voyeur to be the challenge this month & incorporated that idea into my “Candid Creature” shoot. This character is inspired by woodland fairies or sprites and tries to capture a lighthearted innocence. Click here to see the rest from my archetypes series! May the light be with you. Follow Save
Read More
Something I’ve always admired about different bloggers I follow is their consistency with making photography a part of their daily life. Not necessarily behind the scenes of a shoot or out on assignment, but a simple portrayal of enjoying lunch with friends or a walk in the park. So on my yearly trip up north with loved ones, I decided to challenge myself to create a few images that really capture that tradition for me. (And I didn’t even use my phone!) Here are my favorites with thoughts to consider the next time you tackle this particular niche. 1) Put some life in it. 2) Hone in on the details. 3) Try to share a specific mood. 4) Capture humor. 5) Don’t forget the food & drinks. 6) Make some unconventional portraits. 7) Refrain from being a perfectionist. 8) Find an interesting texture. 9) Show an overview of the place. 10) Get in there yourself. May the light be with you. Follow Save
Read More
If you’re a portrait photographer, chances are you’ve come across all different types of people. And though someone may have hired you to capture their image, unless they are a model/actor/musician/or other professional performer, they’ll probably be a little (if not a great deal) shy once you point that lens at them. All is not lost though, here are a few ways to ease their anxiety and make some great photos. 1) Get to know them. If this happens to be a friend, great, you’re already halfway there. Ask them about their recent trip, their pet, their job, anything they really enjoy. If this is someone you’ve just met, do the same thing. Try and find out what they are passionate about, what really gets them riled up. Building rapport isn’t too difficult after a bit of practice. Once you find a similar interest, share some tidbits about yourself. Often times if a photographer doesn’t speak, they seem on a different level or even less human than the subject. Break the silence. Show them you are a person behind the camera as well. 2) Be authentic, yet eloquent. There’s a difference between being polite and being fake. If […]
Read More
This post is definitely geared towards beginners. When starting myself, I didn’t have a guide showing the different types of lenses available. I basically used that kit lens until I wanted to achieve other results & realized there was more out there. I’ll explain not only various lens types, but also focal lengths and touch on different brands as well. Categories There are three different categories of lenses photographers’ wind up using: prime, zoom, & specialty. Within those categories, are different types including: wide angle, normal, telephoto, & macro. Prime Lenses These are the preferred choice for many portrait & lifestyle photographers. They come in a variety of focal lengths, apertures, & price ranges. Recommendations: 24-28mm – helpful when shooting interiors and can also show wide sweeping landscapes. 35-40mm – great for showing environmental portraits as well as interiors. 50mm – the holy grail of a walk-around lens. Excellent for most street, lifestyle, event, portrait, landscape, product work, etc. 85mm – the popular choice for portraits. 135mm – excellent at capturing close ups & makes the most dreamy portraits. 200-300mm – typically sports, other big events, or nature. Zoom Lenses Typically not as fast as prime […]
Read More
For this month I combined 3 challenges: silhouette, paint with light, and sparklers. Thanks to all the festivities and great friends, I was able to create some awesome photos. I had the image in my mind after reading about the “Obsidian Butterfly” myth. I was beyond intrigued, and I knew these three combined together would perfectly represent her. So here are some of those shots! This was a test shot seeing how the light trails from flashlights could shape the wings. This was another test using typical sparklers. These were “Morning Glorys” which were like giant sparklers that burned different colors. I ultimately went with these and had my friend draw wing-like shapes behind my subject. Once the timer went off, I was able to jump in on the ground in front of her and draw swirls with the flashlights which gave even more oomph to the shot. This challenge was so fun and surprisingly simple to do. This was my first time trying long exposure with light/sparklers but knew it was always something I wanted to do. I tested a few beforehand to make sure I had the right shutter speed and aperture, so that prep really […]
Read More
There are 3 different sizes of bag that I can choose from depending on needs for a particular shoot. They are all crossbody style & are of the leather variety i.e. they don’t look like typical camera bags. I’m not really a fan of how the nylon bags look aesthetic-wise, plus they call more attention to yourself while out traveling as opposed to a messenger bag. These are what I use at the moment for occasional freelancing, but I expect I’d need heavier duty types if I worked commercially and traveled a lot with a lot of gear. Small (One camera body with lens on it + one extra lens, extra batteries, cards, charger.) This is the perfect size for a casual day bag. Dimensions: 9″ W x 6.5″ H x 7″ D I found this brand new from Goodwill, but here it is to order. Medium (One camera with lens on it + two extra lenses, one external flash, extra batteries, cards, charger, etc.) I like to use this as my everyday work bag or for simple shoots like headshots. Dimensions: 13″ W x 8″ H x 4″ D This one I also found secondhand at […]
Read More
This niche is closely related to other specialties such as lifestyle & documentary photography, but it differs in a major way. Typically subjects are strangers who you just happen across out and about, not models or clients hired for the job. There are two methods street photographers usually take: conspicuous & covert. Conspicuous Fearlessness is a must when going this route. Much like asking someone out, the photographer must be prepared for the chance of rejection. A help would be to compliment the person, tell them you’re working on a project, and/or have a business card ready to hand over with your email so they have a way to reach out and ask about the photo (then concurrently, you will have a way to send it to them.) You have a chance to guide this individual and if they’re willing, they can even do different poses for you. Covert This is the method I go for because talking to strangers is still nerve racking to me. Stealth is a key skill with this route. Blending in with your surroundings, or going to an already bustling area where people are focused on what they’re doing will yield more […]
Read More
Over the past few years I’ve found an efficient workflow and thought that sharing might be interesting to some. (Disclaimer, I do not currently have Lightroom which seemingly every photographer swears by. Perhaps I’ll get it when I have a desktop, but for the moment, I find this workflow to do just fine.) After a shoot, I go through the images while they are still in camera and delete the definite no’s. I do this here because I’ve learned that the limited memory on my hard drive fills up ridiculously quickly if every image gets transferred. Once I have only the best left, I transfer them over to my drive. When that is complete, I IMMEDIATELY back up those images on my separate backup drive. (Better safe than sorry!) Once I have everything copied over, I like to open up the folder in Adobe Bridge. This is the way our professor taught us how to review our images before editing, and I find it much more helpful than the default preview on the computer. I go through each image and give them ratings. 5 stars are ultimate favorites, 4 stars are those I really like, and 3 stars […]
Read More
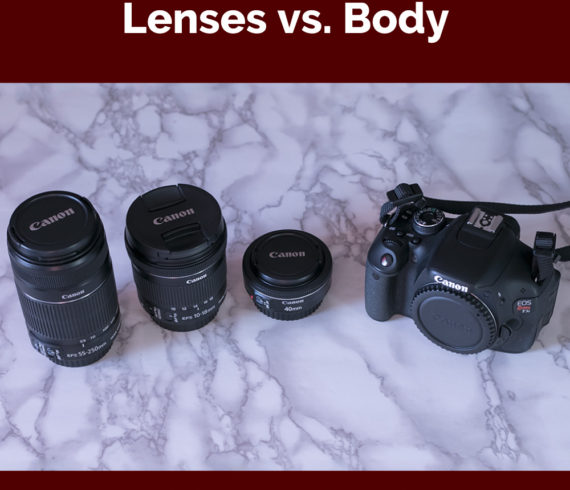
Oh boy. This topic surely is one for discussion. Obviously both a lens and a camera body need to be joined for a DSLR to operate, but the question many photographers have when starting out is “which should I invest more in?” Here I want to share my experiences from working with both Canon Rebels & a Full Frame as well as a variety of lenses. Camera Bodies Cropped sensor Rebel T3 I actually started out with the T3 but I grew tired of not being able to see myself for recording vlogs. I didn’t take many photos with the T3, but I found a definite increase in quality compared to my previous Powershoot. Cropped sensor Rebel T3i I sold the T3 & upgraded to the T3i and really delved into photography more. I found that this camera really helped me become better, and felt no shame at it being a comparatively ‘beginner’ body compared to others, because I was still able to produce images I was proud of. After many years of use, I was starting to crave an upgrade, so I began saving and set my eyes on a full frame body that would aid […]
Read More