What’s often mistakenly called “photoshopping” is actually what editors & photographers refer to as retouching. Along with fixing exposure or changing color temperature, this is a crucial step in editing that helps complete an image. Sometimes, people over-edit until their subjects no longer look human. Unless you’re doing an extraterrestrial shoot, you’ve gone too far. A caveat I should mention is that in certain genres *cough* editorial fashion *cough* it is still expected for an image to be over-edited. While I’m never a fan of this air-brushed “perfection” you may have to follow through with it if you work for a magazine or even on ADs that will be in one. While I wouldn’t refer to these as rules, they are still guidelines that I notice several excellent photographers abide by. You can do what you want with your work of course, but if you are curious about how I retouch, here are some practices I recommend to use and others to avoid. This is step 4 for me in my editing workflow, if you’d like to know how the rest of my process goes, check out this post. DO remove distracting flyaway hairs […]
Read More
Even if you’ve just picked up a camera, chances are you’ve heard of the infamous “golden hour.” Also referred to as “magic hour,” this time occurs right before sunset/after sunrise and provides a very specific type of light. Many prefer the warmth & glow this light creates for their portraits and will recommend it to others. Not typically my choice because of the limited time window and recognizable warmth, I do on occasion shoot during this time. Here are some tips & examples below. Scout beforehand If you have a location in mind, go there before the shoot during the time you chose. You’ll be able to pick specific areas you want to place your subject, and see how the light will really look. Sometimes this timeframe is too dark for the look you’re going for, or will wind up being too yellow for your preferences. Checking ahead of time can ensure you have a backup plan if this location doesn’t work. Show up early If you’re really an early bird, you’ll have to take your subject to your location at or just before sunrise. Depending on how many shots you plan on doing, an hour may […]
Read More
It’s easy to fall into the thought that 1 of something is “limiting” or “not enough” when that simply isn’t the case. You can achieve many different looks with only 1 light and possibly the addition of a reflector. Here are 5 setups to give you some ideas for your own shoots. Sunlight is one major light source, but I won’t be talking about it today. Check out this post to learn more about the different ways to use natural light. The type of light I’ll be using is a small LED on a light stand. You may try these techniques with other artificial light sources as well. Check out my softbox & flash posts for even more tips. Center Front The most basic and probably instinctual way to light a subject. Place your light right in the center of your subject, typically above your camera. This produces an even light and diminishes all shadows on their face. Side Front The most common way to light a subject (even in multiple lighting setups.) Place your light slightly above your subject to mimic our natural view. Side This can provide very dramatic results. Because only one side […]
Read More
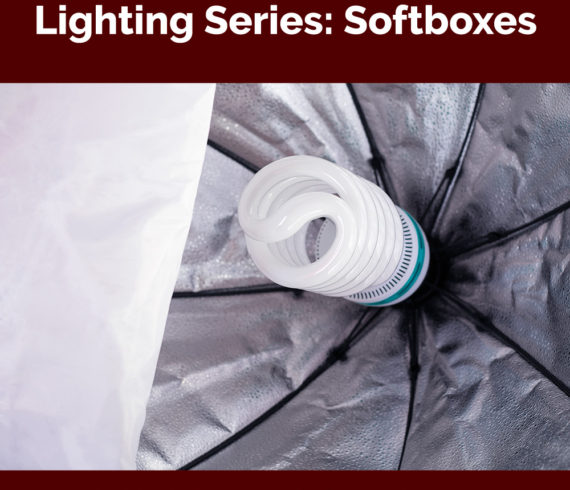
For this week’s lighting tip, I’d like to focus on one of my favorite types: softboxes. There are many affordable kits to start with, and they’re also very easy to use, so they’re great for beginners. Here are a few pros and cons, as well as tips for using them! Pros: Affordable Can be used for photography & video Provides soft, even lighting Cons: Bulky Take extra time to set up Relies on electricity or some other comparable power source Unless you have a team to help you with weatherproof wires and such, I’d stick to using these inside. No need to risk electrocution for any shot! Because these are larger lighting apparatuses, it would be difficult to hide this behind a subject. These work well for main lights as well as fill lights if distanced further away. For example, if you’re using a window as your main light, you could put a soft box a bit back beside the subject for a very even looking fill. In regards to video, these are excellent for interviews, vlogs, or documentary style setups that take place in a controlled environment inside. As long as you have access […]
Read More