So excited to share that one of my favorite companies actually reached out to me and put me on their blog! Aside from already being impressed by the quality of their portfolios & the ethical practices by which they make them straight in Canada, I was further sold by how they treat their customers. From interacting on social media to doing these customer stories, I would recommend them to anyone looking for a new book! Check out the story here. May the light be with you. Follow Save Save Save
Read More
This month my challenge was to shoot an out of focus portrait well. That is in the featured image as you see, but I did want to try and capture a few more that conveyed the ‘constantly in danger’ motif many post-apocalyptic movies have. Check out my full archetype series here! May the light be with you. Follow Save
Read More
Next to portraits, fashion (or more accurately style) is my favorite subject matter to shoot. Whether you’re shooting your own outfits or other peoples’ here are some tips! If you’re shooting yourself you’ll need… A tripod Camera with a self-timer or remote shutter 35mm-50mm lens (avoid wide angle because of distortion & telephotos because you’ll have to stand further away which will make previewing more difficult.) Patience It would be helpful (though not required) to have a camera that has an articulating screen or a way to connect it to a different screen so you can set up your composition quicker. Setup Once you’re at the location, set up your tripod facing your background. Many like to shoot in front of a wall because it makes focusing easier. Finding a wall that compliments or matches your outfit is usually recommended too. Turn your camera to portrait orientation & take a few test shots. Settings In order to get your entire outfit in focus, you’ll need to have a smaller aperture. 5.6-8.0 should be just about right. Due to this however, you will need to have adequate light. Keep your ISO low and make your shutter speed […]
Read More
This month I may be cheating a bit by reusing a previous challenge (silhouette) but I don’t care! These challenges are supposed to be fun, not restrictive, so I’m going forward with them even if they recycle techniques. This was from an impromptu shoot that I didn’t initially plan on making a challenge, but found some real gems. I learned that sometimes some of our best work comes by accident when we’re just out shooting for fun. Check out my favorite here! May the light be with you. Follow Save
Read More
Much like any other professional setting, there are a few universal guidelines to abide by. Presentation, preparedness, articulation, & confidence are all paramount when having someone in the field critique your work and/or consider you for a position. Here are a few tips to help you next time. Presentation It seems obvious, but dress to impress (especially for an interview.) Even though this is a creative field, it’s still important to look put together. Dressing professionally shows the interviewer that you take this opportunity seriously and respect them for sparing some time for you. Your portfolio should also be top notch and ready to view with no torn/dirty/disheveled bits. Preparedness Do your research! Look up this individual/company’s work. Pick out certain aspects of it that you like or have questions on. Write down those things to bring with you so that when they ask if you have any questions you will have some you’ve really thought about. If you wish to display a digital portfolio instead of a printed book, bring your own laptop or tablet fully charged & ready to go. There’s nothing worse than expecting the reviewer to find an electronic device to […]
Read More
I’ve chosen voyeur to be the challenge this month & incorporated that idea into my “Candid Creature” shoot. This character is inspired by woodland fairies or sprites and tries to capture a lighthearted innocence. Click here to see the rest from my archetypes series! May the light be with you. Follow Save
Read More
If you’re a portrait photographer, chances are you’ve come across all different types of people. And though someone may have hired you to capture their image, unless they are a model/actor/musician/or other professional performer, they’ll probably be a little (if not a great deal) shy once you point that lens at them. All is not lost though, here are a few ways to ease their anxiety and make some great photos. 1) Get to know them. If this happens to be a friend, great, you’re already halfway there. Ask them about their recent trip, their pet, their job, anything they really enjoy. If this is someone you’ve just met, do the same thing. Try and find out what they are passionate about, what really gets them riled up. Building rapport isn’t too difficult after a bit of practice. Once you find a similar interest, share some tidbits about yourself. Often times if a photographer doesn’t speak, they seem on a different level or even less human than the subject. Break the silence. Show them you are a person behind the camera as well. 2) Be authentic, yet eloquent. There’s a difference between being polite and being fake. If […]
Read More
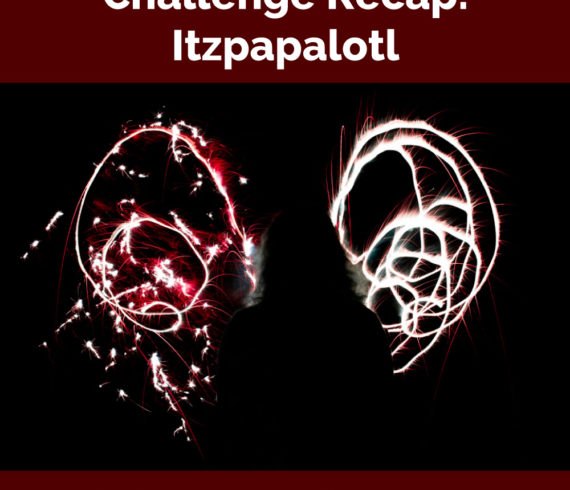
For this month I combined 3 challenges: silhouette, paint with light, and sparklers. Thanks to all the festivities and great friends, I was able to create some awesome photos. I had the image in my mind after reading about the “Obsidian Butterfly” myth. I was beyond intrigued, and I knew these three combined together would perfectly represent her. So here are some of those shots! This was a test shot seeing how the light trails from flashlights could shape the wings. This was another test using typical sparklers. These were “Morning Glorys” which were like giant sparklers that burned different colors. I ultimately went with these and had my friend draw wing-like shapes behind my subject. Once the timer went off, I was able to jump in on the ground in front of her and draw swirls with the flashlights which gave even more oomph to the shot. This challenge was so fun and surprisingly simple to do. This was my first time trying long exposure with light/sparklers but knew it was always something I wanted to do. I tested a few beforehand to make sure I had the right shutter speed and aperture, so that prep really […]
Read More
There are 3 different sizes of bag that I can choose from depending on needs for a particular shoot. They are all crossbody style & are of the leather variety i.e. they don’t look like typical camera bags. I’m not really a fan of how the nylon bags look aesthetic-wise, plus they call more attention to yourself while out traveling as opposed to a messenger bag. These are what I use at the moment for occasional freelancing, but I expect I’d need heavier duty types if I worked commercially and traveled a lot with a lot of gear. Small (One camera body with lens on it + one extra lens, extra batteries, cards, charger.) This is the perfect size for a casual day bag. Dimensions: 9″ W x 6.5″ H x 7″ D I found this brand new from Goodwill, but here it is to order. Medium (One camera with lens on it + two extra lenses, one external flash, extra batteries, cards, charger, etc.) I like to use this as my everyday work bag or for simple shoots like headshots. Dimensions: 13″ W x 8″ H x 4″ D This one I also found secondhand at […]
Read More
Over the past few years I’ve found an efficient workflow and thought that sharing might be interesting to some. (Disclaimer, I do not currently have Lightroom which seemingly every photographer swears by. Perhaps I’ll get it when I have a desktop, but for the moment, I find this workflow to do just fine.) After a shoot, I go through the images while they are still in camera and delete the definite no’s. I do this here because I’ve learned that the limited memory on my hard drive fills up ridiculously quickly if every image gets transferred. Once I have only the best left, I transfer them over to my drive. When that is complete, I IMMEDIATELY back up those images on my separate backup drive. (Better safe than sorry!) Once I have everything copied over, I like to open up the folder in Adobe Bridge. This is the way our professor taught us how to review our images before editing, and I find it much more helpful than the default preview on the computer. I go through each image and give them ratings. 5 stars are ultimate favorites, 4 stars are those I really like, and 3 stars […]
Read More