What’s often mistakenly called “photoshopping” is actually what editors & photographers refer to as retouching. Along with fixing exposure or changing color temperature, this is a crucial step in editing that helps complete an image. Sometimes, people over-edit until their subjects no longer look human. Unless you’re doing an extraterrestrial shoot, you’ve gone too far. A caveat I should mention is that in certain genres *cough* editorial fashion *cough* it is still expected for an image to be over-edited. While I’m never a fan of this air-brushed “perfection” you may have to follow through with it if you work for a magazine or even on ADs that will be in one. While I wouldn’t refer to these as rules, they are still guidelines that I notice several excellent photographers abide by. You can do what you want with your work of course, but if you are curious about how I retouch, here are some practices I recommend to use and others to avoid. This is step 4 for me in my editing workflow, if you’d like to know how the rest of my process goes, check out this post. DO remove distracting flyaway hairs […]
Read More
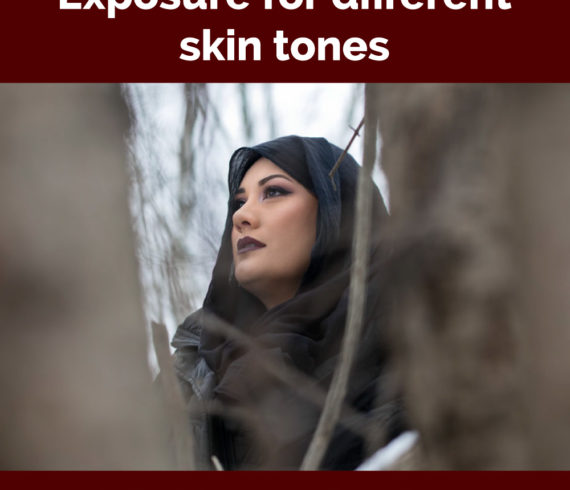
As a person with a nice amount of melanin, I have noticed many an image of pale skin from my peers. It’s an unfortunate result of living in a majorly white society, but it is no excuse for comments like, “dark skin is so hard to expose for!” Inaccurate. If anything, on a very bright day, a white subject wearing dark clothing is harder to expose for vs a black subject wearing light clothing in the same conditions. High contrast will have its challenges regardless of the model’s ethnicity, but I am sick of photographers perpetuating this negative view on minorities. So instead of blaming a person’s skin color, why not try and learn how to change your settings on your camera? If you can’t adapt to different types of people, you still have a lot to learn. See my pseudo photographer post here. The majority of my posts are meant to help in a general sense, but I will not hesitate to point out specific wrongs I’ve seen other photographers do. If you also hear these destructive comments being said, feel free to educate those individuals as well. Alright, rant complete. I’m […]
Read More
Before you begin experimenting with different color temperatures, you need to determine what you want to communicate. Romantic or feminine feelings are typically associated with very warm images whereas edgy and Avant-garde photos are usually on the cooler side. There are many ways you can alter the overall color in a scene. In the scene You decide what the backdrop is & what the subject wears which could wind up contrasting or complementing. You could pick a monochromatic scene with only 1 color feature like I did here: Light Modifiers A popular option a lot of photographers use are colored gels. These thin cellophane-like sheets can clip over their lighting set up and provide varying results with relative ease. I haven’t personally experimented with gels, but I know they provide some interesting results. Camera White balance In your menu there are options for auto, daylight, shade, etc. You can also do a custom WB by taking a picture of a plain sheet of paper and using that as a reference for the scene. Most recommend trying to get accurate white balance, especially if you are trying to show true color rendition. However, if you know you […]
Read More
Over the past few years I’ve found an efficient workflow and thought that sharing might be interesting to some. (Disclaimer, I do not currently have Lightroom which seemingly every photographer swears by. Perhaps I’ll get it when I have a desktop, but for the moment, I find this workflow to do just fine.) After a shoot, I go through the images while they are still in camera and delete the definite no’s. I do this here because I’ve learned that the limited memory on my hard drive fills up ridiculously quickly if every image gets transferred. Once I have only the best left, I transfer them over to my drive. When that is complete, I IMMEDIATELY back up those images on my separate backup drive. (Better safe than sorry!) Once I have everything copied over, I like to open up the folder in Adobe Bridge. This is the way our professor taught us how to review our images before editing, and I find it much more helpful than the default preview on the computer. I go through each image and give them ratings. 5 stars are ultimate favorites, 4 stars are those I really like, and 3 stars […]
Read More